Guide Steps
Getting to the Pay Payables Selection Screen
- From the Navigation window, select MAA > Accounting > Disbursements/Checks > Detail View.
- Click the New button.
- In the Message dialog when asked “Do you want to pay payables or write an off-line check?” click on the Payables button.
About the Pay Payables screen
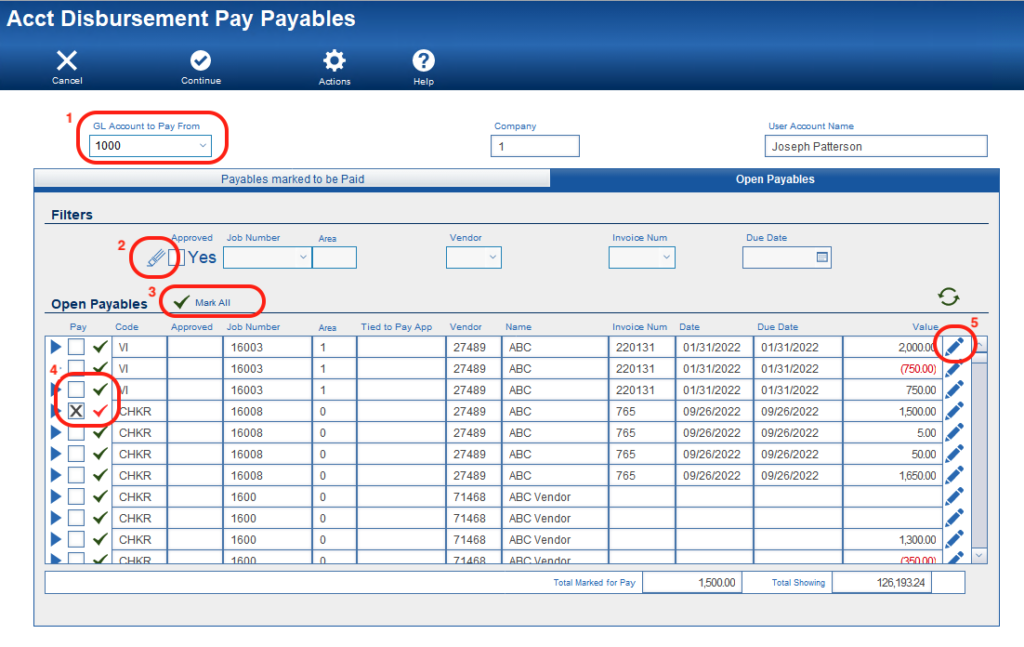
The Acct Disbursement Pay Payables screen has two main Tabs, Payables marked to be Paid and Open Payables. Under the Payables marked to be Paid tab will show all the payables that will get paid when the Continue button gets clicked. Under the Open Payables tab will show all the line items of invoices from vendors that still need to get paid so that you can “Check” the ones you would like to pay.
One key thing here is nothing will show under the Open Payables tab if you have not selected the GL Account to Pay From first.
The overarching concept here is that you will first go to the Open Payables tab, select all the payables you would like to pay, then review them in the Payables marked to be Paid tab and then click Continue to create the actual checks that will pay them.
How to use the Open Payables tab
There are two parts to the Open Payables tab. The first is the Filters, and the second is the Open Payables. The filters are used to narrow the list of viewed Open Payables to select. For example, you can use the Job Number filter to see only the Open Payables on a specific job.
The following are some explanations of the buttons and fields:
- GL Account to Pay From – this must be filled in in order actually see anything under the Open Payables tab. This is because it is very important in selecting payables to know what Account they are being paid from.
- The Eraser button – The Eraser button in the Filters area will clear any filters that were selected so that the Open Payables portal will display all again.
- Mark All button – use this if all of the Open Payables in the portal are to be paid. Usually, this is only used when a filter is selected to limit what payables are being displayed in the portal.
- The Line Item Check buttons – under the Open Payables group in the line items are Check buttons that can select or de-select a line item to get paid. Clicking a green Check will select a line item to pay, whereas a red Check will deselect that line from getting paid.
- The Edit Pencil button – clicking the Edit Pencil button will allow you to split a line item to make a partial payment. When this is clicked, a Partial Payment window opens so that you can enter the Amount that you would like to pay. From there, you can either Cancel or Continue this process. Continuing this process will create two new detail records, a negative (the credit for the partial payment) and a positive (the amount that you would like to pay).
Continuing the Pay Payable Process
After you have selected all the open payables that you would like:
- Click the Continue button.
- In the Acct Disbursement Confirmation screen, ensure the correct starting check number (Starting Number) and the check date (On this Date) are correct. You can modify those two fields to be what they need to be at this point.
- If everything is correct, click Continue.
When you are done, you should end up in the Checks (Disbursement) List View screen. At this point, you can print your checks.
